When we start making a garment, it goes through several processes or steps. As we know at the start of the historical period fit was not considered as a part of the design, nowadays it is the most important factor of the garment. A garment can be accepted or rejected just because of its fitting issue. A quality fitting depends on pattern drifting. As I told you before pattern making is an art in THE HISTORY OF PATTERN MAKING. It is the art of control and implementing a flat piece into curvy 3D for human figures. There are mainly two methods of pattern making.
A pattern is a guide for a fabric that tells the way it can be sewn together to form a garment.
There are mainly two types of methods for making patterns, Block Pattern-Making and Computerized Pattern Making. Block Pattern is three types, Flat Pattern Making, Draping, and Drafting.
1. Block Pattern Making
Block Pattern making methods are the basic pattern to create new patterns for a garment. All the basic block is based either on standard measurements or custom measurements. Here we will know two types of Block patterns which are mostly used to make garments.
A. Flat Pattern Making
Flat pattern making is a procedure of drawing body measurements on a flat surface which means two dimensions. It involves various tools such as Scales, L-Scale, French curve, Pattern master, Notcher to draw a draft on paper which manipulates an existing foundation pattern block. The first pattern which is called Basic Patterns or Foundation Patterns is without any design details. Basic Patterns are the structure of lines which represent body measurements. In the next step, pattern makers involve necessary changes as per the details of the designs, and this is known as Working Patterns. After this, a test fit is made which helps to see the transition from two dimensions to three-dimensional form. At this stage, pattern makers need to correct any fitting issues and balance the designs. Now, a Final Pattern is made with all the necessary details, with no faults, seam allowances, notches.
The Main Features of Flat Pattern Making
- Flat Pattern making starts with a paper, so therefore these are 2D.
- As these are 2D, therefore are very important to make design around the body rather than focus only on front or back views.
- So, basic patterns include Basic Bodice front and back, sleeves block, Skirt front and back blocks.
- Test fit all those patterns you have made on a mannequin or on a human body to check balance, proportion and other elements of a design, necessarily fitting.
- Check the fabric qualities, textures, with those patterns.
- Once no problems or faults found you are free to create variety of desings.
The Steps of Flat Pattern Making
1. Basic Block Pattern
In this step, we draw a structure made of lines representing body measurements on paper.
2. The Working Pattern
In the second stage, all the design features are marked and checked.
3. The Final Pattern
In this stage, we cut the fabric accordingly to convert the working pattern into a final pattern by adding seams and pattern information.
Pattern Information:
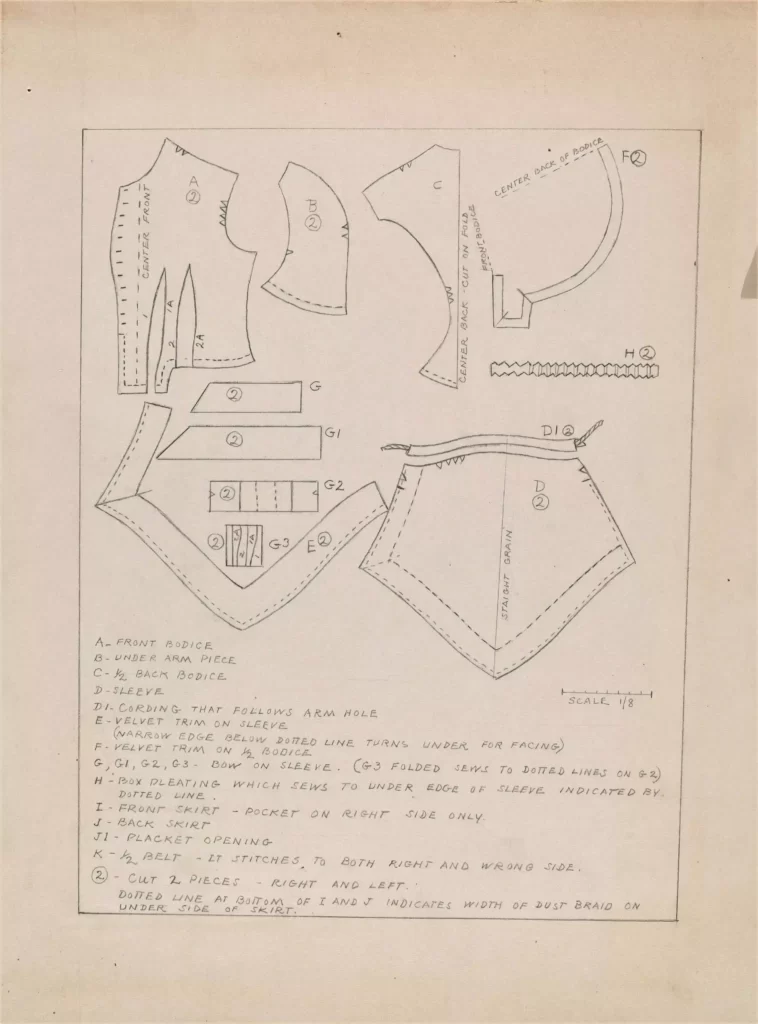
10 Instruction Steps to Simplify Cutting and Stitching Fabrics.
- Label each pattern piece.
- Mark the center of front and back.
- Note the number of pices to be cut.
- Mark fold lines where the left pattern is equal to the right side.
- The balance marks to sewn the pieces at the correct points.
- Seam allowances.
- Draw construction lines
- Darts
- Button Holes
- Pocket Placements
- Pleat Lines
- Tucks
- Decorative lines
- Draw Grain lines
- Grain line arrows
- Directions
- Pattern Sizes
- Style Number
Grain Lines
Grainline is drawn in each pattern block to indicate how the pattern should be aligned with the fabric lengthwise. Regardless of where these grain lines are placed, they will always place parallel to the edge.
> Grainline Arrows define which way pattern can be placed. Single arrow grain lines are used for one-way prints and napped fabrics.
> Straight grain lines are drawn parallel to the center for garments cut on the straight grain. Cross-grain lines are drawn at right angles to center for garments cut on crosswise grain. Bias grain lines are drawn at an angle to center (45-degree angle for true bias) for garments cut on the bias.
B. Modeling or Draping
Modeling is also called Draping or Draping on the Stand. It is a three-dimensional method of pattern-making that involves muslin fabric for fitting of block garment on dummy body of the desired size. Later this muslin paper is transferred to paper for creating the final pattern. As draping is a 3D method, you will notice the progress of your design and make necessary changes easily before cutting and sewing. Draping is a good technique to create new ideas, new Silhouettes and helps to see balance, fittings, proportions, and other design features on a dress form.
The Main Features of Draping
- Draping begins with muslin padded dress form. It also can be Paper Mache, Palstic molded dress form or Adhesive Paper dress form.
- Muslin is blocked, ironed, and marked before starting.
- Draping helps to clearly see the flow and fall on a fabric.
- By draping method tou can do easy experiments in various designs on a garment like neckline, collar, sleeves, yokes, etc.
- With all the advantages it is a time consuming, and expensive method.
Keep These in Mind, to Select Fabric Correctly
- The feel, and weight of the fiber.
- The material of the fiber like linen, cotton, wool, silk, etc
- Garment type according to the style, age, occassion, season and must the customer.
- The tested fit and fall of the garment.
- Colors, surface ornamentation, detailing.
Designers like Giorgio Armani, Issey Miyake, Coco Chanel, Manish Arora, Amit Aggarwal, Ritu Kumar, Sabyasachi, Wendell Rodricks, and many more have very well understood the properties of various fabrics and created interesting garments or rather pieces of art.
C. Drafting
Drafting is taking measurements of chest, waist, hip, length, and other parts from the sizing system or directly from the model and then marking the necessary allowance on a paper, and lastly completed by drawing structure lines to make the pattern.
Keep These in Mind, While Drafting Patterns
If the garment is symmetrical, which means the left and right sides are the same then make only one side pattern in the paper and then flip it and copy it on the opposite side. This way you can’t make mistakes.
Add Allowance to the actual measurements. Those extra spaces will allow you to be flexible while sewing the garment and also for the model to feel comfortable and change in the future if he/she wants. On average give 2cm allowance everywhere. But it depends, for sleeves, it can make those loose fitted, so 1cm is okay, while for waist, bust 3-4cm allowance is okay.
5 Instruction Steps for Drafting
Follow these instructions and draw the patterns in an organized manner to grasp on Draping.
- Label each piece of the pattern. Then, Number chronologically each piece to be cut with each pattern piece.
- Clearly show or mark the folding lines, pleat markings, etc.
- Seam lines and cutting lines should be clearly shown using blue and red pencils if the Seam allowance is included in the draft. Matching notches or balance marks should be also marked with seams to show which seams are to be joined together.
- Mark lengthwise lines like this ⬅➡, to indicate the direction of keeping patterns on the fabric.
- Cut outward notches at the center front and center back of pattern pieces. It will help at the time of stitching collars and completing.
2. Computerised Pattern Making
A Pattern can be made in 3D form with the help of technology. In this case, an individual’s measurements are collected by a 3D Body Scanner. Then those measurements are used for creating a 3D model. Then after defining the garment surface, it creates a 2D Flat Pattern.
Computer technology like CAD/CAM first appeared in the 1970s. Creating patterns using CAD is the easiest and most advanced of all pattern-making techniques. You just need to become familiar with the system you’re working with. Changes can be made easily on the screen for further operations like marker making, grading.
The major technological features are Pattern Design Systems and Pattern Generation Systems. Technology makes pattern-making easy that are repetitive. Computerized design systems speed up the process of pattern making, also improve accuracy. Many new designers computerized pattern-making techniques to ease the works required to develop a new style.
That's all for today! I hope you liked it (❁´◡`❁)
Read more on PATTERNS!
THE HISTORY PATTERN MAKING
BASIC PATTERN MAKING TERMINOLOGIES
PATTERN MAKING 30 USEFULL TOOLS
BODY MEASUREMENTS GUIDELINES AND PROCESS
SIZE CHARTS - WOMEN STANDARD BODY MEASUREMENTS
PATTERN INFORMATION: SEAM ALLOWENCES - GRADING


2 Comments. Leave new
Good work. Keep it up
Thank You Baba, sure ❤