Measurement is a very important element as the fit is very important for a garment. Measurement should always be done with accuracy and doubled checked.
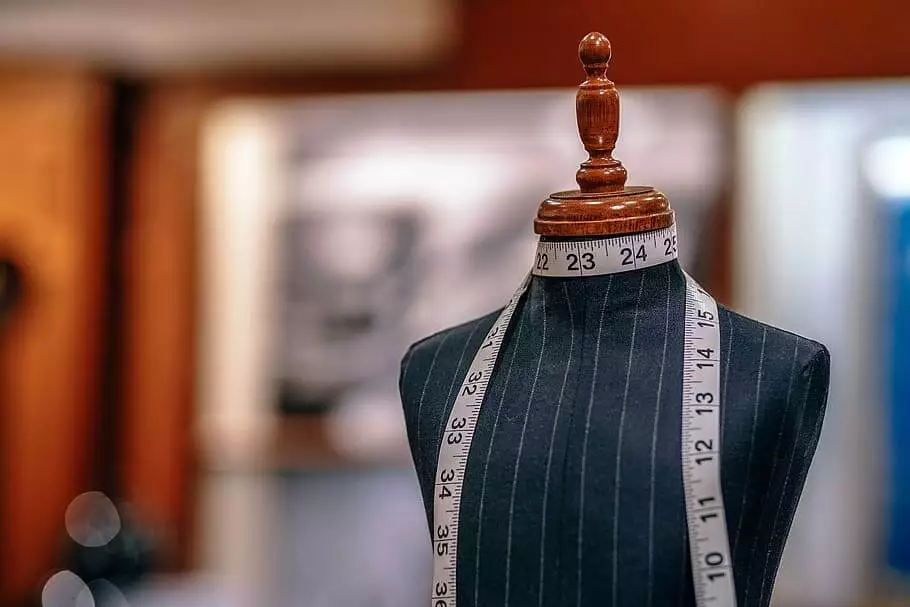
Guidelines for Taking Measurements
Grab your siblings/s if you have otherwise Invite one of your friends for helping you, or ask your father/mother, model him/her, and take his/her measurements. That’s the best way to learn how to take measurements, practice. You don’t wanna try it on yourself because that will not be accurate at all.
Now, follow these steps to get accurate results:
- The person whom you are/will be taking measurements should wear fitting clothes, not loose fitting, but skinny fitting. Loose-fitting garments will not help you to identify body landmarks and will lead to wrong measurements.
- Stand in the right posture. Make her/his posture right by placing her/him in front of a wall first.
- Feet should be together, a palm apart, not more than that. Because if you wide apart your feet the total height of the person will decrease and will lead to wrong measurements.
- Now based on what cloth she/he is wearing take the measurements closely. Don’t think to take extra because she/he is already wearing something, so, taking measurements closely will help to get the right fitting. Not tight but close, the tape should touch his/her garment.
- Keep a mirror at the back, so if you are taking measurements from the front, it will help you to get a back view.
- If you’re taking width-like waist measurements make sure the tape is lateral. And for vertical measurements make sure the tape is perpendicular to the floor.
Process of Taking Measurements
Girth Measurements
Girth measurements include all the round measurements of the body. For example neck, bust, waist, etc.
| Bust Circumference | The bust measurement is taken around the bust of the fullest part. Make sure the tape is parallel with the floor and also notice the back with a help of a mirror. Measurement will be taken by inserting one finger and no extra spaces must not be added. |
| Waist Circumference | Like the bust, measurement needs to be taken around the fullest part of the hips. |
| Hip Circumstances | Measure around the base of the neck over the collarbone. Ensure that you measure with a thick thread and then measure the part of the thread. |
| Neck Girth | Measure around the base of the neck over the collar bone. Ensure that you measure with a thick thread and then measure the part of the thread. |
Horizontal Measurements
Horizontal measurements are the width measurements like shoulder length.
| Across Back | Measure from the highest shoulder point (HSP) where the neck meets the shoulder line to the lowest shoulder point (LSP) where arms begin that is acromion bone at the end of the shoulder. Taking one side will complete the process. |
| Across Chest | Hold the tape from one armhole to the other armhole approximately 10 cm below of throat. |
| Shoulder Length | Measure from the highest shoulder point (HSP) where the neck meets the shoulder line to the lowest shoulder point (LSP) where the arms begin that is acromion bone at the end of the shoulder. Taking one side will complete the process. |
| Across Shoulder | Measure from one LSP to the other LSP. Measure the back. |
Vertical Measurements
These are the length-wise measurements like leg, hands, back and front bodice length, etc.
| Front Length | Measure the front length from HSP to the waistline. Remember to pass the tape over the bust line, not across the middle. |
| Back Length | For taking the back length start from the shoulder line where the neck meets at the back to the waistline. Pass the tape across the spine. |
| HSP to Bust | This is also called Scye Depth. Measure 2.5 cm down from the armpit to the center back. |
| Armhole Depth | This is also called Scye Depth. Measure 2.5 cm down from the armpit to center back. |
As of now, we know all the basic guidelines for taking basic measurements. Now we will know how to take the measure of a particular area.
Sleeve Measurements
| Sleeve Length | Straighten the arm alongside your model. Then measure from the lower shoulder up to where the sleeve will be. |
| Under Arm Length | Tell the model to fold her/his arm so, the biceps come in the fullest form. Then measure the bicep. Measure both biceps separately because in most the cases it’s not symmetrical. If you’re doing loose-fitting sleeves that would not be necessary. |
| Armhole Girth | Measure the armhole by entering one finger. |
| Biceps Girth | Again fold your arm and then measure your elbow. |
| Elbow Girth | Again fold your arm and then measure elbow. |
| Wrist Girth | Find the wrist bone and measure around the length. |
Skirt Measurements
| Waist | Now, we tool Waist and Hip measurement, it is the time to get the length from waist to hip. So hold your tape at the side-back, above one side of the hip to get the perfect measure. |
| Hip | Identify the fullest part of the hip and measure that around. Make sure your tape is parallel to the ground and keep one eye on the back through a mirror. |
| Waist to Hip | Like the same measure Waist to Knee. |
| Waist to Knee | Measure the waist to where the ankle ends. |
| Waist to Ankle | Measure waist to where the ankle ends. |
Trouser Measurements
| Crotch Depth | Measure from the Waistline (Based on rising of the pant) over the hip to the anklebone. |
| Inside Leg Length | Measure from the crotch point to the anklebone. Take the measure from inside. |
| Outside Leg Length | Measure from the Waistline (Based on the rising of the pant) over the hip to the anklebone. |
| Thigh Girth | Measure around the thigh after the crotch point. |
| Knee Girth | Measure around the knee. For formal trousers, you must leave a 2-finger space. |
| Ankle Girth | Measure around the ankle just before the anklebone. For formal trousers, you must leave 2 finger space. |
FEEt Measurements
| Sock Measurements | There are various lengths and types of socks. Here we will know the basics. |
| Sock Height | Place the tape a few inches above the ankle depending on how long the size will be up to the heel. The extra part will be managed by the curvy area. |
| Foot Length | Place the tape or in this case, you also can use a scale or ruler on the floor. Now place your model’s foot beside the tape. The heel’s curvier point should be the starting point and check where the longest toe is ending. The whole process should be in a standing position. Make sure you look parallel or perpendicularly. |
| Foot Girth | Place the tape around the foot’s widest part to get the right measurements. |
Apart from this traditional method, Anthropometrics was introduced which is a methodical and precise method of taking body measurements. The tools are referred to as Anthropometers to measure linear, calipers to measure across, and calibrated to circular measurements. But this method is very time consuming and not recommended for newbies.
Tools
All you need is Tape & thick Thread for measuring.
That's all for today! I hope you liked it, leaving a comment will encourage me to write more (❁´◡`❁)
Read more on PATTERNS!
THE HISTORY OF PATTERN MAKING
METHODS OF PATTERN MAKING
BASIC PATTERN MAKING TERMINOLOGIES
PATTERN MAKING 30 USEFULL TOOLS
SIZE CHARTS - WOMEN STANDARD BODY MEASUREMENTS
PATTERN INFORMATION: SEAM ALLOWENCES - GRADING
*All Photos are from Creative/Wikimedia Common Licence*
